Saturday, November 15, 2008

Hello Kitty Can


I made this can for a little girl that my daughter goes to preschool with. She invited Syd to her birthday party, Since this was the 1st party that my daughter has been invited too (without brother) she is really excited. I was at Target and they ahd all this cute Hello Kitty stuff in the dollar spot so I picked up some of the cuter stuff to put in the can. I made one like this for a friends little girl and with all the other stuff she got that day the can and the little book that i covered and put in there was the thing that she was playing with the most. I put "Kailis stuff" on the can so that she could keep her trinkets in it. I think most little girls like being able to have somewhere to keep their spacial things.


I used DS and MF to weld and cut her name. I then used the new Hello Kitty die from Sizzix. Then I used the threading water edge punch, a chip board tag, $1 stamps, Prima's and skittles. I then finished off the lid with some "fun fur" (since I just learned to knit) I really like the way that it came out!
Wednesday, October 29, 2008

Halloween Treat cans

Ok so I wanted to make something for my kids teachers for Halloween, since this is one of my favorite holidays! Also I think it is good to let the spacial people in your life know that you are thinking of them and who is more spacial than teachers!? So I made the mistake of asking my 4 year old what she thought we should do with this can. Well funny enough my daughter is scared of just about everything right now but she wanted to go with this scary grave yard theme. I started with a recycled can (mocha mix from Costco) I covered it with dark blue paper (CM) I then cut the grass (PDDU) and inked it (distressing ink pine needle) Then I cut the grave stones and the arch (PDDU) inked them (pine needle) then covered them with embossing powder (distressed black shoot) For the witch I colored a circle using colored pencils then odorless mineral spirits to blend, then stamped with Versa mark then black embossing powder. The trio of spooked is also a stamp that I embossed then cut out so that they would look like they were lurking in the back ground. The Spider is also a CB die I then covered with diamond glaze and added red bling for the eyes. He is hanging by a piece of thread.
I then cut the fence (PDDU) and inked it (vintage photo) I cut it to fit in between the grave stones. I cut the ghost's on the CB using ( CB and Quickcut dies) Then the pumpkins and the bats which were also CB. I then poked holes in the can and used some small gauge wire which I wound into a spring and used glue dots to attach to the can. Oh I almost forgot my cute little skulls which are also CB I used pop dot to put some of them on the head stones.


Even though I love the way the 1st can came out I figured that if I was going to get 2 more of these done I better try something with a little less detail!
I have some great Halloween papers so I figured I would use some of those. I also had my new MS drippy goo to put to some good use. I also had just revamped my daughters witch costume so I had some extra feathers from that.


This is the can I made for the great ladies that work in the office at my sons school. They are always so nice when me or my husband goes into the school. They are also the ones that have had to make sure that my son took his med's everyday after lunch.


This is the one that I made for my sons teacher she has been great with him this year and I know that he can be a bit of a challenge at times! He is in a 1st/2nd grade split so you know that she has her hand full!


All 3 of the cans had homemade popcorn balls and chocolate chip, coconut banana bread


Monday, October 27, 2008

Mr Bones bag

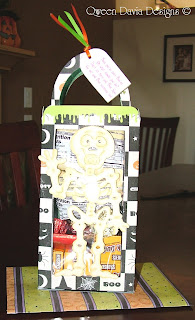
I made this bag for some friends that live in Idaho. I thought the kids would get a kick out of it! I used PDDU for "Mr Bones" and I used PS for the bag. I did it in DS and stretched it to fit a 12x12 mat. Paper is from DCWV. I alss used my MS drippy goo punch around the top. The tag reads "Now you've been Boo'ed oh what should you do? Don't sit there and Boo Hoo go out and Boo someone too" I also gave them the Mr Bones card that I posted a While back.

Friday, October 10, 2008

Oliver Thank U

This is a card that I made for my good friend Alicia to give to her vet who has taken such great care of her animals over the years. She just had her cat Oliver in there and the vet took extra good care of him and she wanted to say thanks, so this is what I came up with the kitty on here looks as close to Little Oliver as I could get! I used AK for the pattern of my little tear kitty. The eyes and nose are Peachy Keen stamps. then I used some thread for whiskers and a bell I had laying around (see there is a reason for all the clutter!) I then put the kitty on a chip board circle and used some chipboard letters that I have. I have left the inside blank so that she can write a spacial message. I am very happy with how this little guy came out!

Thursday, October 9, 2008

little pixy

I am so happy with how this LO turned out! I was inspired by Jill It is my 1st try at tear bears & my 1st time sewing on the photo mats and ribbon! I love the look but am always scared to try this but since I had an extra set of these pictures I went for it!

The sign is from PDDU knight I sized it using CDS

The Flowers are Primma's and the buttons are just some of my vast collection.


This is my very 1st tear bear! Man she was a lot of fun to make but let me tell you they are time consuming! I used PDDU pixy for the dress, shoes and wand, which I sized in CDS to get the right fit. The wings are for the PDDU angel, which I used the CB swirls folder on and used Versa Mark and shimmer chalk on. The belts is just some random pearl strand that I had laying around as are the bows on both bears.The eyes and nose are Peachy Keen stamps

Here is a close up of my pixy bear and her sign again I used PDDU pixy to make the shoes ( I cut 2 pairs then just used the right ones so that they were pointing the same way) and the dress, which I just cut in half. The wings I also cut in half, embossed with the CB ( the folder I got from Oh My Crafts tehy have great prices on all the Cuttle Bug stuff!) and used Versa mark and chalk over the swirls. Then layered them, again to make her look like she was standing to the side.

I did the quote on the computer the type is called Fairy dust and I think that I got it at
http://www.dafonts.com/ I then used the Ranger Embossing pen and Bridal powder to make a few words "pop"

Tuesday, October 7, 2008

The eyes have it

I went a little out on a limb here with the color, but I really wanted to highlight the big blue eyes. Both of my children were blessed with beautiful eyes and I wanted to play to that on this page. there is no journaling on this page since there was not really a lot to say I think that the pictures do the talking here. I did put "4 months" in the bottom left corner so at least her age would be there. The paper is my minds eye. I used CDS to make the square frame, also used are some buttons, chipboard, brads, and the threading water punch. I got the idea for the LO from Scrapbook trends July 2007 I just love these idea books! Here is the LO that I got my inspiration from The LO is by Doris Sander and is called Florida Snowman

Monday, October 6, 2008

I got an award!


Blog Award Rules: Here are the 6 rules;
1. The winner can put the logo on their blog.
2. Link the person you received your award from.
3. Nominate at least 5 other blogs.
4. Before listing the nominees give a brief reason why you chose them.
5. Put links of those blogs on yours.
6. Leave a message on the blogs you have nominated.


well I have to say what a treat it is to be given an award for doing something that I love! I also need to send out a big thank you to Lillie better know as Um Buggen for giving me this award! Check out her wonderful work
http://d-swat.blogspot.com/ There are so many great blogs out there, so I am not taking picking 5 of them lightly!

Lynn of
beautiful delights
does the most wonderful LO's she is so open and friendly when you need a helping hand

Jen of
Brain things
is a new one that I have found she does wonderful things with CDS. She gives me inspiration that I can create things and if not she is willing to share! Also you can tell just looking that the header on her blog she is a fun loving fun lady, and i think would be a blast to hang with!

Annette of
My Paper trail
This is another great blog that I have just discovered! her work is just amazing and you just have to check her out!

Jill of
Jill's Paper Gems
all I can say is wow! she may be a baby bug on the Cricut site but she has so much talent to share with us all! Her blog is more than worth a stop by to check it out! Plus who could pass up a fellow Esme!

Laura of
The Paper Poppy
wow what can I say but an amazing designer inspiration to us all!


Saturday, October 4, 2008

We meet at last


This one was a little harder for me I do not do mushy very well and lets face the first time you hold your new baby is a very mushy time! The pictures that I had of this time were sort of odd shots cause I had a C-section we were in the recovery room and I was all hooked up to monitors and such.

I used CDS & PS for the tittle. I also used the threading water punch. The flourishes are from Bo bunny covered in DCWV card stock. Other papers are Chatter box and Bazzill. There are a few Prima's and skittles to finish out the page. The journaling was done using the computer.


Wednesday, October 1, 2008

Little Star

Ok this page came together very easy for me I found some Basic Grey paper (love it ) that matched prefect! This is my daughter at 5 months in her 1st swim suit. My Friend Kathy gave her the cute pink glasses which matched prefect! I tried to keep this fairly simple the stars are from PS I cut them 4 times 1 in "chipboard" and one in card stock in each size. Putt hem together then sanded and inked the edges I like the way it turned out the otehr stars are Heidi Swapp ghost stars (they are fun to use)

Sweet Baby

Well here is a LO of my Sweet baby girl (ok she is almost 5 now!) But as you can see she was not here. I used the MS lace punch and made a couple of shaker flowers. The journaling is hidden behind the photo on the right cause I hate the look of my hand writing but keep hearing people say that I should write some of it cause my kids will treasure it someday.

This is just a close up of the large shaker flower I used some baby show confetti in here.

Puppy love

This is a book I made for a friend who needed a gift for someone who took care of her pets this summer while she was on several camping trips. Since she has both puppies and kitty's I thought this would be great shaped album for her.


had to do a little christmas since I know a lot of people get their pets pictures during the holidays


The paper is Heidi Swapp (from Costco) then I just used what ever I had laying around that would go with it. If there is something that you want to know feel free to ask and I will try and tell you where I got it.

Monday, September 29, 2008

Panty Raid


ok so I have this friend who has a b-day coming up and she is quite the kick in the pants (pun intended!) So when fair time rolls around in the very small town that she lives she like to lat her hair down and enjoy time with family and friends so she went online and found her a pair of


"party Panties" They were quite cute and had a little martini glass on them and they said "I need a stiff one" Now I have just heard the story and have not seen the panties so I am not sure that mine even come close but I made her this pantie card for her upcoming Birthday.I used the bathing suit bottom form PDDU and cut the ties off, I did this on CDS and just made them so big that it would not cut the ties. Then put it together with glue. The paper is for DCWV rock star Now on the inside I printed (now this is not for the faint of heart)


" Its your Birthday...


So you deserve a stiff one...


and in those pantie I am sure you will get one!"

Friday, September 26, 2008

Crabby thank you


We had a party for my husbands birthday this last weekend, and he got a crab trap from his brother and sister in-law and so I thought that he should send a thank you and I have this cute little crab punch and I was going to make a crab trap but that was a little to much for me this week so instead I went with a window card and "trapped" the little crabs in between. I made this using DS ( I am becoming such a junkie ;) I then added a little tag with a studio G stamp

Special order baby card


Ok I had a blast with this little guy I have a good friend that needed a baby card for a good friend they love all things western so this was a natural choice.


I layered all this out on the DS (man that is a time saver, paper too!) Used PDDU and NA then I inked every thing and stamped the face (peachy keen is there any other?) ran the hat band, kerchief, and diaper through the CB. Then heat embossed the boots to give them a little shine. I covered some chipboard with the same paper and stamped with these great little wood stamps I got at Craft Warehouse for $1 (per set upper and lower) They are great but a little hard for a control freak like me cause it is harder to get them straight like clear stamps not quite sure where I was stamping :p. I then added some ribbon and a boot from the collection of Jewelry that I do not wear any more (think of it as recycling ;) Then I I made a pocket on the inside for a gift card.

Live Laugh Love


This is something that is hard for me to do I am not good at sympathy cards it is such a hard subject. So I thought that I would go int eh direction of celebrating life rather than the loss of it. I know some might think that is not the right sentiment but i know for me that is the way that I try to look at loss. tho think about what that person meant to me rather than focusing on the loss of them. This is an 8 1/2 by 3 1/2 tri-fold card (my 1st!) I used the birds & swirls embossing folder, some ribbon, and a few lace hearts that I cut and hung on a ring from the ribbon. I used the MS lace punch, then I stitched along the inside dots for a little color.

Tuesday, September 9, 2008

Cards for River Fest

I have been very busy trying to get up a good stash to take to River Fest with me here are some cards I did over the weekend I would love to know what you all think!

I have seen this Owl card done by many others before me but I just could not help making one of my own! I used DS for the card and the envie. It is hard to tell from the photo but the brown paper on the owl is flocked and looks really neat in person. The inside says "Woo loves you baby"

I just love this cut from HEA so I used DS to make this card any little princess would love to get. I used the Martha lace punch on the envie


Ok so I decided that I needed a few shaped cards! I love my Big Bug and figured I should use some of the great things on some of these carts that I have. I made this using DS and PDDU it is hard to tell from the picture but "Mr. Bones" is cut out in the front and the patterned paper that you see is on the inside of the card. Happy Haunting is a rub on. I also made the envie from DS


ok I have had this little guy laying around for some time now I made him for a project that never quite happened. I made the baby using NA and the fireman outfit is a sizzix dress up die. the inside says " I know how much you like a guy in uniform. Happy Birthday"


Love these girls you can just do so much with them! the hat is a rub on the pumpkin is a brad. I used the treading water punch some ghost and chip board stars that I inked then added UTEP to. the sediment is a stamp


Ok I just love Lola Rose and her Sister I am really wanting to get another download of these girls they are just too cute! I made the greeting using word art and a dollar stamp. the metal charm is one from a card making set (it is suppose to stick to the card but I used my handy little crop-a-dile to make a hole then used the paper tagger to adhere)


This was just one that was to fun to pass up I am trying to get some variety in my cards and this is just too cute
I always for get how much I love the PP cart until I cut something from it I really like how this one came out. the inside says "wish you were here"


This is a fun little birthday cards that I did using PP. the inside says " I hunted and Hunted for the best dog-gone birthday gift around, but i had to settle for the best dog-gone card instead Happy Birthday"